.png)

How to Do Payroll in Canada
Figuring out how to run payroll for your small business can be difficult. That’s why we’ve created this detailed step-by-step guide on how to run payroll in Canada.
From hiring your first employee to easily running payroll and filing your own T4s, we’ve covered all of the steps you need to know to run your own payroll.
Hire an Employee
If you’re reading this, you probably already have an employee or are considering hiring one. Hiring the right employee is a huge part of running a successful business.
Through a bit of trial and error, we’ve come up with a hiring method that works well for us. However, that’s a separate topic that I won’t get into in this article. For a good starting place, we recommend reading Who: The “A” Method for Hiring
Alternatively, the employee may be you. If you run your business through a separate entity like a corporation, it can be a good choice to pay yourself as an employee.
You can learn more about the different ways to pay yourself through a corporation by reading our article about salaries vs. dividends.
Gather the Necessary Info from Your Employee
The next step is to collect the necessary information from your employee(s). You will need your employee’s:
- Federal and Provincial TD1 forms filled out and signed (What are TD1s?)
- Mailing address
- Social Insurance Number
- Date of birth
- Bank account info if paying by direct deposit
- Contact info such as phone number, email, etc.
You will also want to clearly outline employment details, such as the compensation that your employee will receive, in an employment agreement.
There are many free employment agreement templates online that you can use, or you can quickly build one through a paid service such as LegalContracts.ca.
Choose the Method - Payroll Software or Manual Payroll
You can pay your employees using payroll software or manually using a ledger and cheques or e-transfers. Unless you’re comfortable calculating payroll deductions and remittances, we recommend using payroll software to run payroll.
It’s more common to make errors when processing payroll manually. It’s frustrating for both employees and employers, plus there can also be some pretty stiff penalties from CRA when mistakes are made.
Payroll Software
We recommend using payroll software such as WagePoint or Rise. They both offer automatic calculation and remittance of payroll deductions as well as the ability to pay employees through direct deposit.
Manual Payroll
If you do prefer to run payroll manually, you can use a combination of the CRA Online Payroll Deductions Calculator and Google Sheets or Excel to track pay information.
This can be a good method if your payroll is basic and you’re comfortable with calculating and tracking payroll info.
We’ve written an in-depth article on how to use the CRA Online Payroll Deductions Calculator. Jump to that article if you would like to learn more about how to manually run payroll.
🎥We also have a YouTube series on how to manually run payroll linked here👈
Decide on Payroll Frequency
Before registering your business for payroll, you’ll want to know the payroll frequency that you will be using.
The two most common frequencies for payroll are:
- Bi-weekly (every two weeks)Semi-monthly (twice per month)
These are quite similar, but we find that one option is better than the other depending on your circumstances.
The very short version of how to decide on frequency is:
- If you have any employees paid hourly use bi-weekly.
- If you only have employees paid by salary use semi-monthly
Now we’ll explain it more thoroughly by going into some pros and cons of each.
Bi-Weekly Pay Periods (Every Two Weeks)
Paying your employees every two weeks has a lot going for it, but there is one major drawback that we’ve seen cause problems.
Pros
- Your employees are paid on the same day of the week every time (often every second Friday). Easy for them to remember “Yes! Friday is payday!”
- Employees are paid slightly more frequently (every 14 days instead of every 15-16 days). This can help employees’ cash flow by reducing the time period between paycheques.
For hourly employees, this method makes it easier to remember the dates for which they are being paid. Typically, hourly employees are paid with a one week delay.
Cons
- Twice per year there will be a month that includes three pay periods. If your business has a monthly cycle for revenue, this can create cash flow problems on those months. It also makes consistent financial reporting more difficult comparing one month’s results to another.
Because of bi-weekly can cause 3 pay periods in one month, we prefer semi-monthly when employees are paid on salary. However if employees are paid hourly, then bi-weekly makes tracking hours easier.
Semi-Monthly (Twice Per Month)
Paying your employees twice per month makes the administration more difficult when paying hourly employees, but it is our preferred method when you only have salaried employees.
Pros
- There are only two pay periods each month. This helps keep your cash flow predictable and will make it much easier to compare monthly financials.
- Pay days are always on the same day of the month (usually 15th and last). This can help your employees plan for monthly expenses such as rent or mortgage payments.
Cons
- Paydays occur on different days of the week because they’re attached to numbered dates (15th and last day of the month for example). There is no set day of the week that employees can remember as payday.
- For hourly employees, it’s more difficult to keep track of what hours are included in which pay period.
Register Your Business for Payroll
If you don’t already have a business number registered for your business, then the first step is getting one of those. Check out Small Business BC's helpful guide on business registration.
If you have a business number, the next step is to register for a payroll account with CRA.
Register for Payroll Through Business Registration Online (BRO)
The easiest and most efficient way to register for payroll is through Business Registration Online. This business registry service guides you through the process and can handle multiple types of program accounts in one go.
It will ask you for some information to prove your identity. This includes your social insurance number, date of birth and postal code.
Then you'll work through some steps to provide the applicable information to open a payroll account for your business.
- Enter your business number and the type of business
- Enter the date for which your employees were first paid (or will be paid)
- Confirm the business' address
- Set up an email address to be notified when CRA sends you mail about your payroll account
- Note which months the business is in operation each year ("all year" is an option here)
- Note your employees' payment frequency (typically we see bi-weekly or semi-monthly here but there are other options available too)
- Note the number of employees in the business and total expected salaries within the next 12 months (an estimate is fine here)
- Lastly, you'll be presented with a summary of your responses and asked to confirm everything
There is a bit of data entry required, but this is usually an easy way to go through the process without calling CRA.
Call CRA to Register for Payroll
Alternatively, you can call the CRA business enquiries line at 1-800-959-5525 and ask to open a payroll account.
The agent will ask you a few questions (how many employees, approximate gross payroll, payroll frequency) and will then set things up for you.
If there's no wait on hold to speak to an agent, calling CRA can actually be a very straightforward way to get your payroll account setup.
Complete an RC1 Form to Register for Payroll
Another way to register for a payroll account is to fill out an RC1 form. You’ll fill out part C to add a payroll program account to your business number. Once filled out, send this form to your tax centre.
Now that you’ve registered your business for payroll, it’s time to set up the payroll software.
Payroll Software Setup - How to Set up Wagepoint
Setting things up properly in the beginning will reduce the chances of making costly mistakes.
We’ve found that WagePoint is the best all around online payroll software currently available for Canada. Here is a step-by-step guide to setting up your payroll in WagePoint.
Get Started and Confirm Your Account
Navigate to the WagePoint website, enter your email address and click “Get Started”. Fill in some basic info, click “Get Started” one more time.
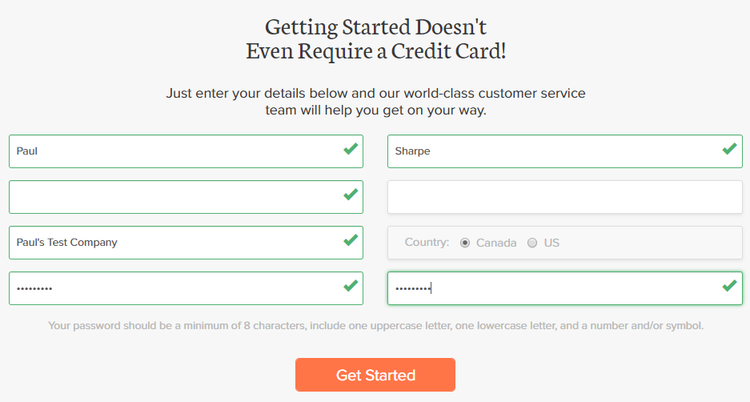
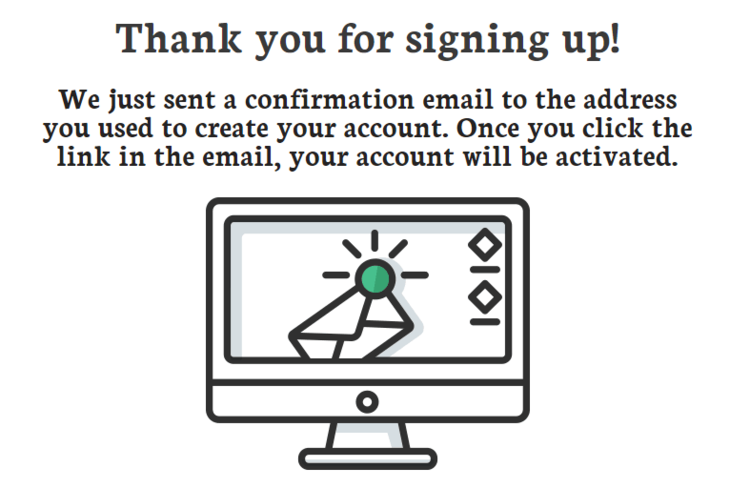
You’ll then receive an email confirmation. Check your inbox, click “confirm email”. You’ll then be taken to the login page. Login and begin your payroll setup in WagePoint.
Step 1 - Company Info
Company Info
Here is where you will be entering the basic information of your business. On the Company Info tab, fill in the required information fields shown below and click “Save Changes”.

Company Holidays
From here, select the Company Holidays tab at the top and select “Load Stat Holidays” to populate the list with all of the default stat holidays. Delete the holidays that don’t apply to your province. In the example below we’re in BC, so I will delete the other provincial holidays.
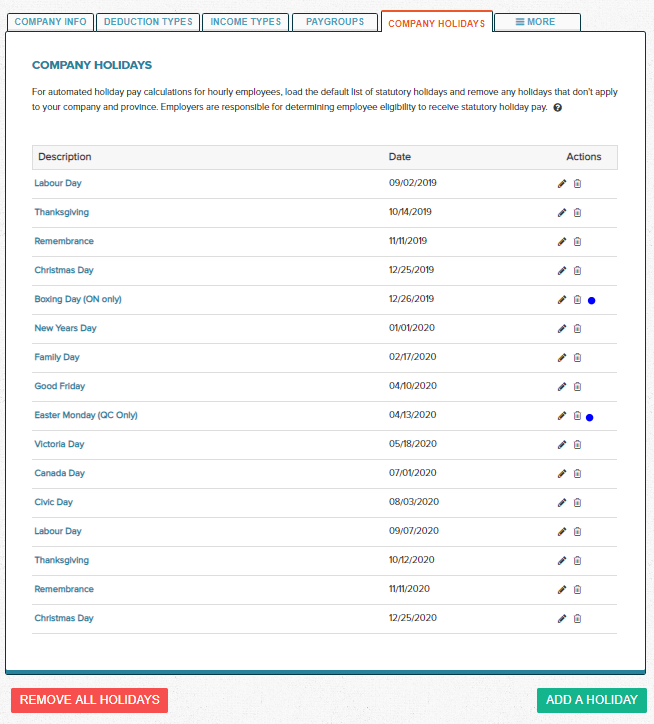
You can also leave the other provincial holidays if you would like your business to observe them.
ROE Authorization
Under the “More” tab, select ROE Authorization. You’ll fill out some basic contact information and then sign an ROE Web authorization form. This will allow WagePoint to file ROEs on behalf of your business.
This is optional, but I recommend doing this as it’s much easier than filing them on your own. You will need to complete employee setup (step 3 below) before you can finalize this step.
The rest of the tabs within Company Setup are optional. These are:
- Deductions - Add any deduction types you may want. Some common examples include health benefits, life insurance and RRSP contributions. It’s quite possible you don’t have anything to add here, but a quick chat with your accountant will help clear this up.
- Income Types - WagePoint will add default income types that should be enough for many businesses. If your employees earn other types of income, you can add those here as well.
- Paygroups - Some employers have multiple paygroups. For example, an employer may pay its employees within both semi-monthly and bi-weekly paygroups. This would be pretty uncommon and you will likely just ignore this tab because your one paygroup is already set up.
Step 2 - Banking Info
Next up is to set up the company’s bank information. WagePoint will withdraw the necessary funds directly from your bank account to be sent to employees (net pay) and the CRA (payroll deductions).
Click Banking on the top menu and choose the Banking Info tab. Here you will enter in the bank account information for the business. This is where the cash will come out of after you process payroll.
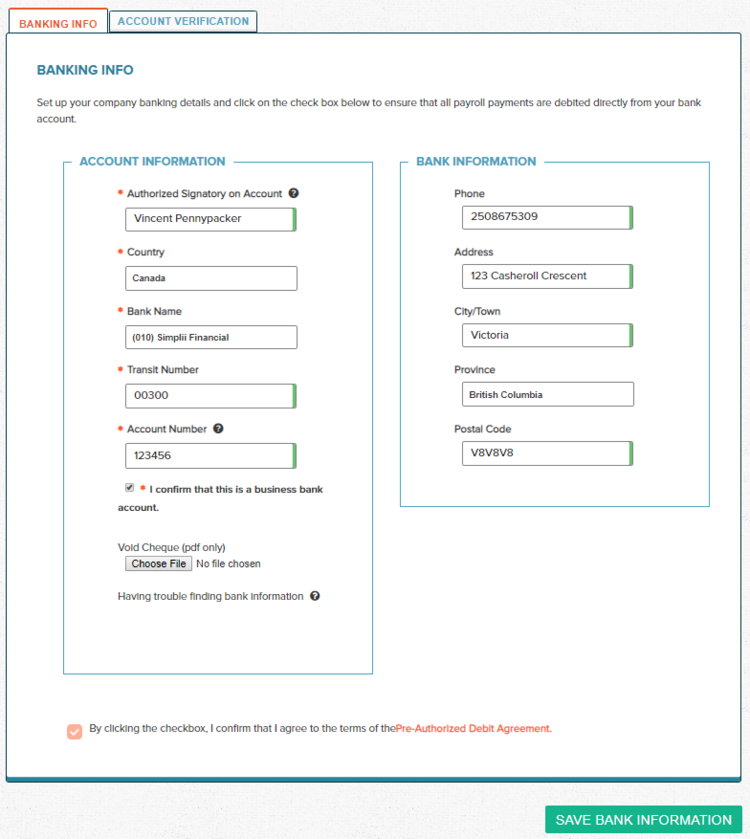
Click Save Bank Information once you’ve filled this out.
The next step is Account Verification. WagePoint will deposit a small amount into your account (usually between $0.01 and $0.40) within 4 to 6 business days of when you save your bank information. In my experience, the deposit arrives within 2 or 3 business days.
Once your deposit shows up, choose the Account Verification tab and enter the deposit amount and click “Complete Validation”.
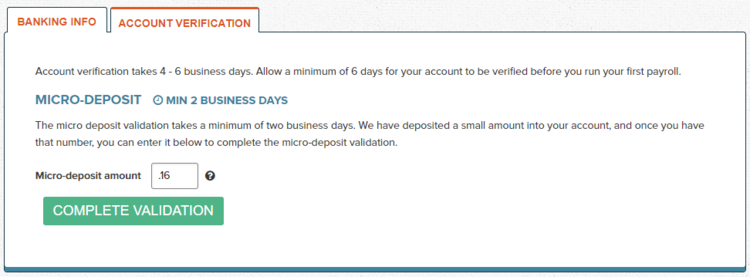
The business bank account is now validated and you’re ready to go.
In real life, you probably have a few days to wait for account validation, so you can get started on employee setup in the meantime.
Step 3 - Employee Info
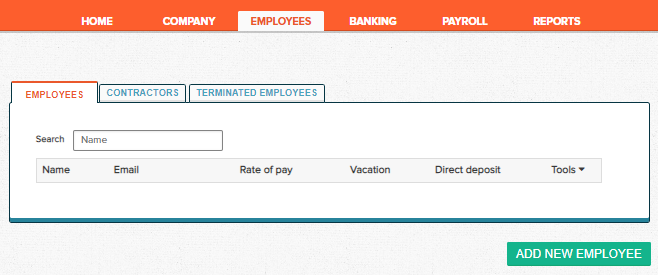
Next up is employee setup. Choose the “Employees” tab at the top of your screen and you’ll be presented with an empty list to be populated with your awesome team.
The Person
Click “Add new employee” and begin adding details on the “The Person” tab as shown below.
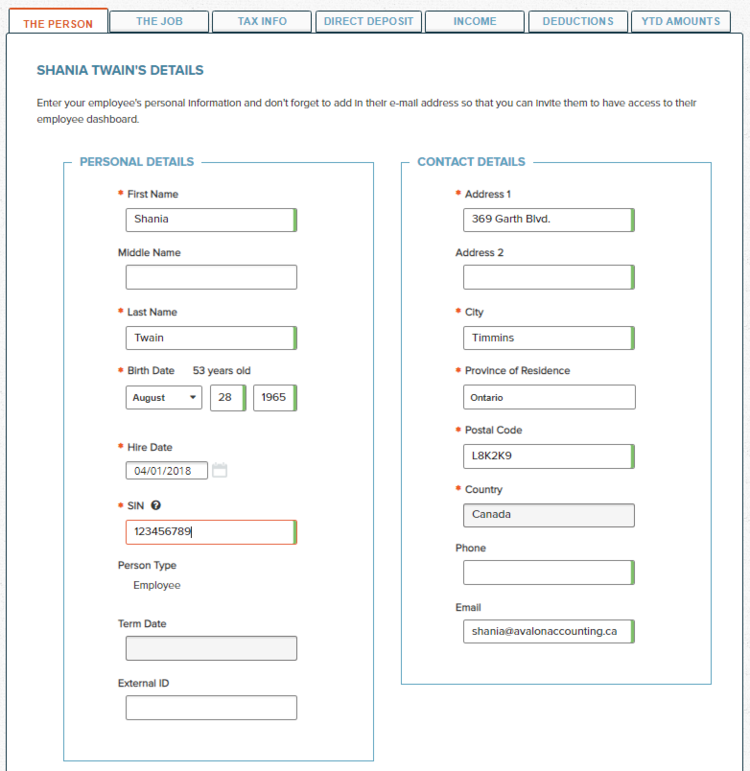
Make sure to hit “Save Changes” once you’re done with this tab.
The Job
Next you’ll be adding information about your employee’s compensation in the “The Job” tab.
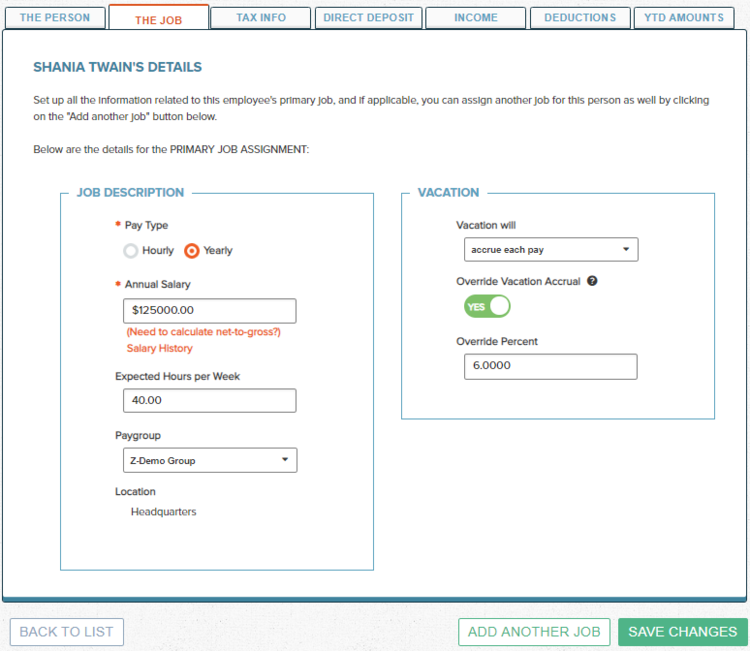
- Pay Type - Hourly pay if your employees will be paid by the hour. Yearly if your employees are paid on a salary.
- Annual Salary / Hourly Rate - Enter the rate of pay for either the year or by the hour depending on what you’ve selected for pay type.
- Expected Hours per Week - This is where you can enter expected hours that the employee will work per week. For salaried employees it’s important to enter the expected amount as this number may be used in preparing an employee’s record of employment if they leave their job.
- Vacation - Vacation pay will either be paid each pay period along with regular earnings or accrued. Accruing vacation means that the employee can take time off at a later date and be paid using their accrued vacation balance.
- Vacation Percent - The default for is 4% (equivalent to 2 weeks) vacation as it is the minimum amount to be paid in Canada. You can override this by choosing “Yes” and entering a new percentage below it. Shania is earning 6% vacation or the equivalent of 3 weeks.
Note - Minimum wage and vacation rates are different from province to province. Check out your provincial labour standards to find out what these are.
Don’t forget to click “Save Changes."
Tax Info
Move on to the “Tax Info” tab. You’ll need your employee’s TD1 forms filled out for this part

- Federal Claim - Use the drop-down menu to enter the federal tax code from your employee’s TD1 form. If they would like additional tax withheld from each paycheque, you can make that happen in the “Add Additional Tax” field.
- Provincial Claim - Select the province of employment from the drop-down menu and choose the provincial tax code from your employee’s provincial TD1 form.
- Withhold Tax - withhold income tax should be yes unless your employee’s TD1 forms say not to.
- Exempt from CPP/QPP - There are a number of circumstances where an employee would be exempt from contributing to CPP. These are less common, but you can learn about CPP deductions here.
- Exempt from EI - Employees may also be exempt from EI. The most common circumstance is when the employee is the owner of the business or is directly related to the business owner. Find out more about insurable employment exemptions.
You’ll find a wide range of tax settings for your employees, but Shania’s setup is the most common one that we see for employees that are not related to the business owner.
Save Changes!
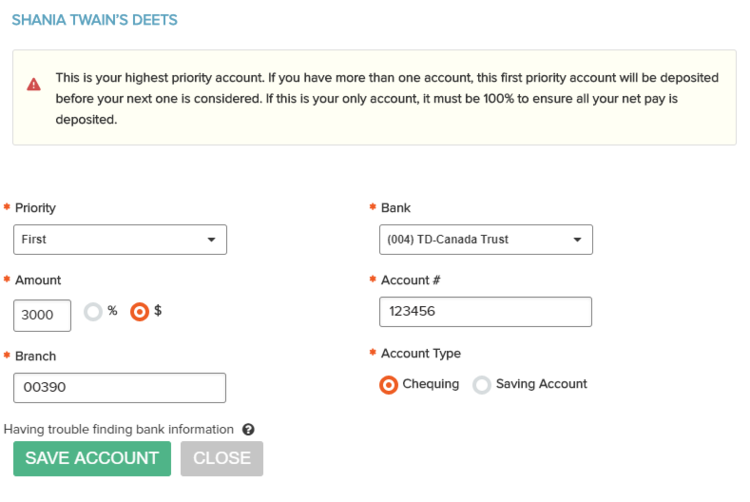
Direct Deposit
Your employees can be paid via direct deposit. Enter the direct deposit information that your employee provided using the “add bank account” button.
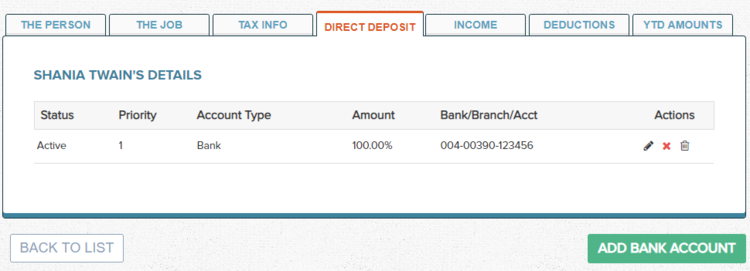
If your employee has multiple accounts that they would like their pay split between, you can use the “Priority” section to do that.
Choose a specific amount or percentage of the net pay to be deposited into the first account; the remainder will be deposited into the second.
Income
On the income tab you can add any types of income that you would like to be associated with the employee. If you leave it blank, the company default income types will still be available to use when running payroll.
This is a good place to come if you need to add a special income type for a single or multiple pay periods for an employee. See the screenshot below for some examples of how this can be used.
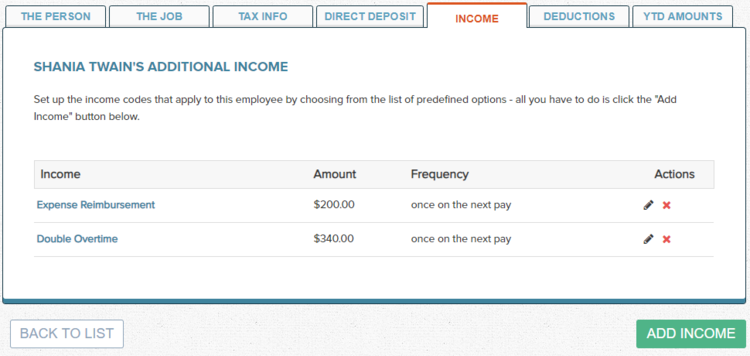
However, it’s likely that you can just use the defaults and move on to the deductions tab.
Deductions
If you will be deducting amounts from your employee’s pay other than CPP, EI and tax, use the deductions tab to set up the amounts and frequency. Common examples are health, dental and other types of insurance.
Setting these up can be quite complex, so it’s a good idea to reach out to your benefits provider or accountant for information on how to do this.
Here is an example of Shania’s deductions relating to various types of insurance coverage.

Year to Date Amounts
The last tab in the employee setup section is for year to date pay and deduction amounts. It’s only necessary to use this tab if the employee has worked for you during the year and the payroll was not processed through WagePoint.
If you are beginning to use WagePoint part way through the year and are adding in existing employees, you will want to find their YTD figures and enter them like in the example below.

It’s important to be accurate with the YTD amounts because it will affect the employee’s T4 amounts.
If you’re setting up a new employee, you can skip this tab altogether.
Employee Setup Complete! Now it’s time to learn how to run payroll.
Payroll Processing
Congratulations, you’ve completed payroll setup. It’s time to select Payroll from the menu at the top and pay your employee(s) for the first time!
Step 0 - Planning
Before getting started processing payroll, it’s important to understand the timing of everything.
There is a three business day processing time between when you submit payroll in WagePoint and when the funds are deposited into employee bank accounts.
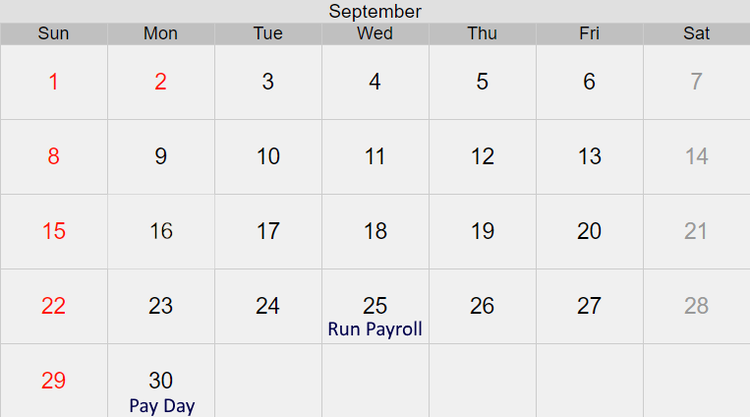
Because of this, you will want to run your payroll in WagePoint at least three business days before you’d like employees to receive their paycheques. For example:
- Payday - is Monday September 30th
- Run Payroll - Three business days earlier by noon EST. In this case that is Wednesday September 25th
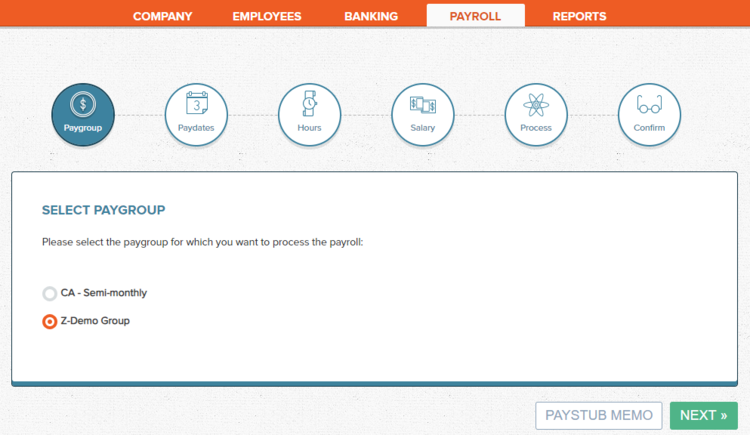
Step 1 - Select Paygroup
Some businesses may have multiple paygroups set up and this is the chance to choose which paygroup to pay.
If you’ve just finished setting up WagePoint for your business, it’s likely that you only have one. Choose your paygroup and hit “Next”.
Step 2 - Pay Dates
Next up, you will want to select the pay dates for this pay period.
- First Day - This is the first day for which employees are being paid in this period.
- Last Day - This is the last day of the pay cycle. If you have employees paid hourly, they’ll report their hours worked between the first day and the last day of the pay period.
- Pay Date - This is the actual day that paycheques will be deposited into employee bank accounts.
- Off Cycle - You can toggle this to “Yes” if you need to make a payment to employees off of your regular pay cycle. Leave it as “No” for any normally scheduled pay periods.
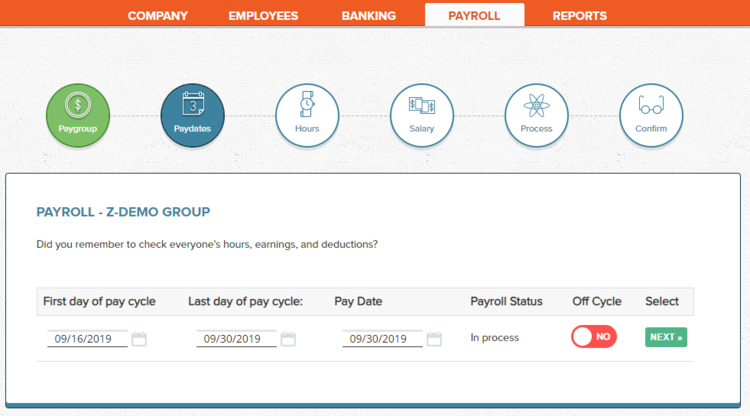
Salaried Employees
In our example above, we are paying salaried employees on a semi-monthly (twice per month) basis. This means that their pay day is either on the 15th day or the last day of each month.
Because pay amounts remain the same each period for salaried employees, it’s quite straight-forward to run payroll. You can contact WagePoint support and ask them to automate it if you’re happy to just set it and forget it.
Hourly Employees
In our planning step above we discussed the three day processing time for payroll between running payroll and pay being deposited into employee bank accounts.
Because of this there is an issue when employees are being paid hourly and the number of hours worked fluctuates from one pay period to another.
If you have to process payroll three business days before it’s paid to employees, how would you know how many hours they worked on those last three days?
In this case, we recommend a one week delay between the end of a pay period and the pay date. Let’s look at a bi-weekly (paid every two weeks) paygroup example:
- First Day - Sunday September 1st
- Last Day - Saturday September 14th
- Pay Date - Friday September 20th
Employees will report hours worked from the first day to the last day of the pay period.
You’ll then process payroll on Tuesday the 17th by noon EST. Deposits will arrive in employee accounts on Friday September 20th.

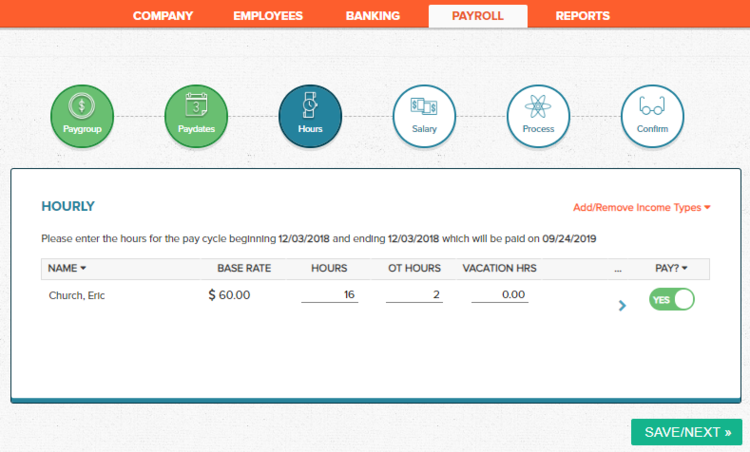
Step 3 - Hours
Once you’ve clicked “Next” on the pay dates section, WagePoint will take you to a list of any hourly employees that you have.
This is where you’ll enter the total number of hours worked for each employee during the pay period. Enter hours worked and any overtime hours as shown below.
You can also use the “Add/Remove Income Types” drop-down menu to select other types of income that you might want to include. This is optional, but here is what it looks like.
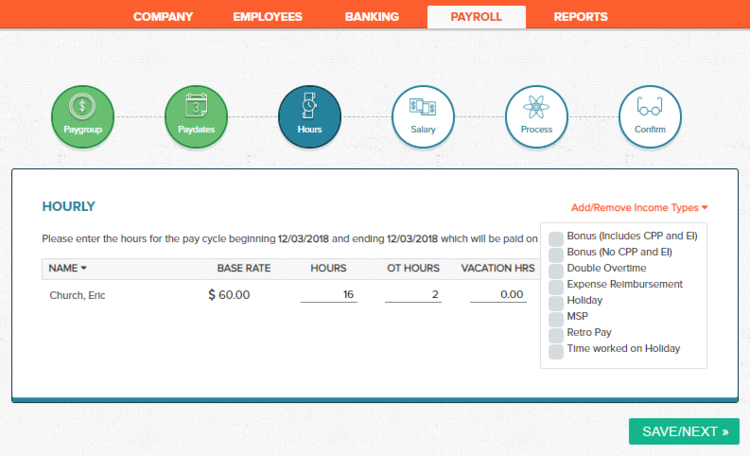
Once you’ve selected an income type from the drop-down, a new column will appear to the right. You may need to use the right arrow to scroll and see the new income field.

Double check that the “Pay?” field is properly set to “Yes” for all employees you want to pay this period and “No” for any hourly employees that didn’t work that period.
Click “Save/Next” once you’re done entering information for your hourly employees.
Step 4 - Salary
Next up, you’ll review your salaried employees’ information. Most of the time this won’t change from one pay period to the next so you can usually just click “Save/Preview”.
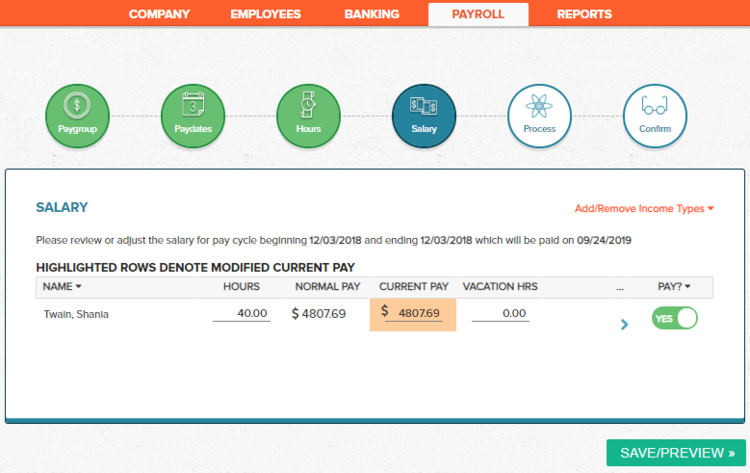
If there are any changes to pay amounts, you can either update the “Current Pay” field to change the amount paid or use the “Add/Remove Income Types” like we did with the hourly employees.
Make sure “Pay?” is set to “Yes” for any employees that you want to pay and click “Save/Preview”.
Step 5 - Preview and Process Payroll
Next you will be reviewing the amounts to make sure that what you’ve entered is correct.
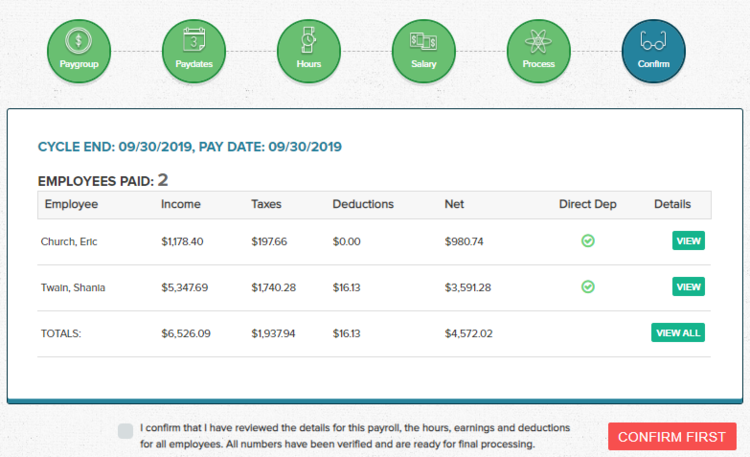
Click “View” or “View All” and check over the following details for your employees:
- Hours - Make sure the total hours worked appears correctly.
- Income - Check that the various income types for each employee are correct and that amounts are accurate.
- Vacation - WagePoint will look after vacation accruals or pay outs. Review amounts to make sure they make sense.
- Deductions - These should be automatically calculated by WagePoint, but it’s a good idea to look them over to make sure nothing appears out of the ordinary
The last step before confirming and processing payroll is to check how much cash will be withdrawn from your bank account to fund the payroll.
Click “View All” and scroll down to the very bottom of the payroll details window that opens up.
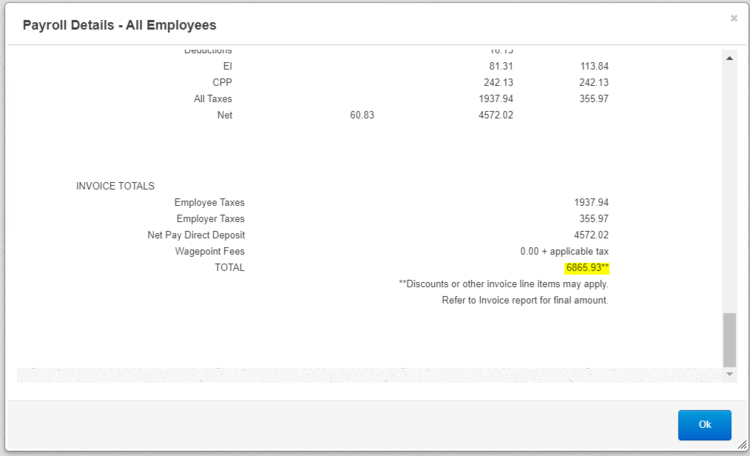
In our example, we can see that WagePoint will withdraw $6,865.93 from the business bank account.
This amount includes pay that will be sent to employees as well as payroll remittances that will be sent to CRA.
Check your bank balance to make sure you have the funds to cover payroll and then you’re ready to finalize things.

Check the box that says “I confirm that I have reviewed the details...” and click “Approve Payroll”.
Congratulations, you’re done for this pay period!
Pay Your Payroll Remittance
Employers are required to withhold source deductions (CPP, EI, Income Tax) from employees’ pay and remit them to the Receiver General (CRA) at regular intervals. This is extremely important to get right because there can be significant penalties if errors are made or if remittances are not made on time.
Canada Pension Plan (CPP)
CPP must be withheld from employees’ pay except in some specific circumstances. There are two parts to CPP withholdings: an employee paid portion which is deducted from the employee's pay, and an employer portion which must be paid by the business.
Employment Insurance (EI)
EI must also be withheld from employees’ pay except in specific circumstances. Just like with CPP, there is an employee portion which is deducted from the employee’s pay, and there is an employer portion that must be paid by the business.
Income Tax
Income tax must also be withheld and remitted to the Receiver General. In this case, there is only an employee portion that is deducted from their pay.
Remittance Dates
Most often, payroll remittances are due to be paid to the Receiver General monthly. The due date would then be the 15th of the following month. For example, January source deductions would be due on or before February 15th.
It's important to know what your remittance due dates are. Learn more about remittance frequency and due dates.
Late Remittances
It is bad news to have late payroll remittances. Late filing penalties alone add up very quickly:
- 3% of the amount owed if it is one to three days late;
- 5% if it is four or five days late;
- 7% if it is six or seven days late;
- 10% if it is more than seven days late.
Used in context, if you had four full time employees and you were eight days late on your remittance, you could easily have a $600+ late filing penalty. To make matters worse, late filing fees are not tax deductible.
How to Pay Payroll Remittances
How you calculate and pay your payroll remittances will depend on whether you’re using payroll software or not.
Using Payroll Software
If you’re using a payroll software application like WagePoint, the payroll remittances will be handled for you. Each pay period the software will withdraw the source deductions from your bank account and remit it to the Receiver General on your behalf.
We think that this is the best method because it drastically reduces the chance of making a costly mistake with payroll remittances.
Manually Running Payroll
If you do decide to run payroll manually, you will have to calculate payroll remittances and then send the payment to the Receiver General yourself.
The easiest way we know of to manually calculate payroll remittances is by using the CRA online payroll calculator. You can read our article on how to use CRA payroll remittance calculator here.
Once you’ve calculated the amount, you will need some additional info that has to be provided with the payment. This includes:
- Payroll Account Number - this is your business number with an RP 000# at the end of it. Usually starts with a 7 or an 8 and looks something like this 88888 8888 RP 0001
- Pay Period - which payday(s) you are remitting for.
- Period End Date - The last day for which you are remitting source deductions.
- Gross Payroll - The total amount of wages paid during the remitting period.
- Number of Employees - The number of employees you paid during the remitting period.
- Remittance Due Date - The due date for your payroll remittance.
With this information in hand, you can submit payment using a number of different methods. Details and links to payment options for businesses can be found on the CRA website.
File T4s Each Year
You’ve likely received T4s from employers in the past. Now that you’re the employer, you will need to prepare and file T4s for all employees that worked for you during the calendar year.
Luckily, payroll software applications like WagePoint can do a lot of the legwork for you when it comes to filing T4s. Here’s a quick rundown of how it works in WagePoint.
Step 1 - Review Year-To-Date Reports
After the calendar year is over, a “Year-to-date” report will be available under the Reports menu within the “More” tab. Navigate to this report and take a look at each employee’s report to make sure nothing looks out of the ordinary.

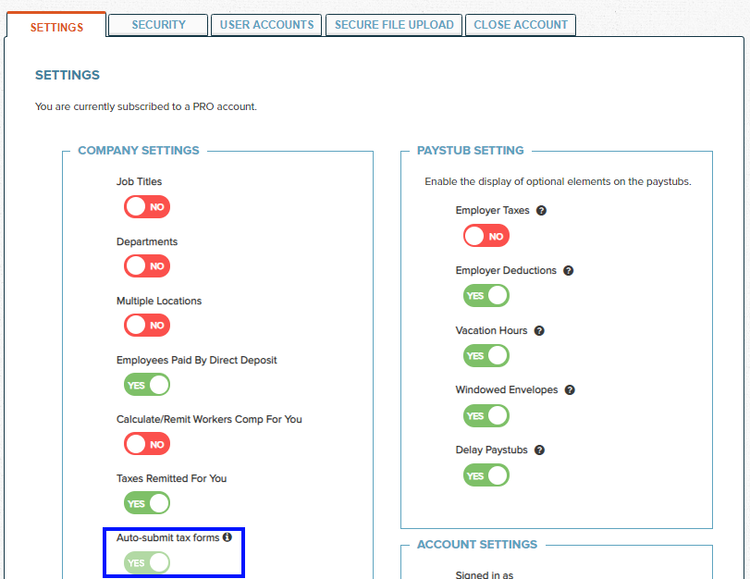
Step 2 - Confirm Auto Submit Status
WagePoint will automatically submit the T4s to CRA on behalf of your business, but it’s a good idea to make sure this setting is turned on.
Navigate to Account Settings under the dropdown menu at the top right of your screen. Then choose the “Settings” tab. Make sure the “Auto-submit tax forms” setting is set to “Yes”.
Step 3 - Verify Employee Details
Navigate to your employee list and check that your employees’ information is correct and up-to-date in the system.
For both active and terminated employees you will want to check the following info to make sure it is still correct.
- First and last names (has anything changed since you entered it into the system?)
- Social Insurance Numbers
- Addresses
- Tax Settings

Step 4 - Compare Payroll Remittance Report to CRA
Throughout the year, WagePoint has been remitting your payroll source deductions to CRA on your behalf.
You will want to compare the total remittances per WagePoint’s report to the amount that CRA shows on your Statement of Account. Here’s how:
- Pull up the WagePoint Remittance Report (Reports > More > Remittance Report) for the current year.
- Check the total amount on the December Statement of Account (Form PD7A) that CRA sends you in the mail. You can also find this through your CRA My Business account online if you have it set up.
The amounts on both reports should agree.
But what if they don’t agree?
If they don’t agree, there are a number of things that could be causing this. Some common situations include:
- You began using WagePoint part way through the year so the WagePoint remittance report is not showing remittances that you made manually.
- Interest or penalties have been charged on your CRA account causing a different amount to show up on the CRA report.
- Amounts have been transferred from one period to another within your CRA account.
If you are struggling to find out why the reports don’t agree, give your bookkeeper or accountant a call. We’ve seen this enough times to usually be able to pick out the problem right away.
It is important that these amounts match up. It can cause a pretty big headache with CRA if they don’t.
Step 5 - WagePoint Files Your T4s with CRA
WagePoint will then file the T4s on your behalf before the deadline. T4s are due to be filed for the previous year on the last day in February.
Manually Preparing T4s?
If you are running payroll manually, we suggest that you ask a competent bookkeeper or accountant to help prepare your T4s. In our experience, the cost of having someone prepare and file your T4s is worth it to avoid the potential hassle and penalties of making errors.
There are a lot of moving pieces and complicated rules involved and things can fall apart quickly.
Get Payroll Support
While it is completely feasible to set up and operate your own payroll, you may not have time or the skill set to do so. That’s where a competent bookkeeper or accountant comes in.
If you're looking for help with payroll, Avalon can help!
We offer payroll services as part of our service packages.
Frequently Asked Questions
While we’re at it, we may as well answer a few of the common questions that we get about running payroll.
How to do Payroll for One Employee
There are a couple of options for running payroll for one employee. Run manual payroll using the CRA Payroll Deductions Calculator or simple payroll software like PayWorks or Wagepoint.
If you’re doing it manually, check out our manual payroll guides linked below.
- How to use the CRA Payroll Deductions Calculator Blog Post 📝
- How to Run Payroll in Canada YouTube Series 🎥
These options also work for doing payroll for a small business.
How to Set up Payroll
Once you’ve hired an employee, setting up payroll has a few steps.
- Register for a payroll number with CRA
- Gather the necessary information from your employee (TD1 forms, mailing address, SIN, Date of birth, Bank account info, contact info)
- Choose payroll frequency (bi-weekly or semi-monthly for example)
- Choose payroll method (manual payroll or use payroll software)
Once these steps are completed, you can run payroll manually using the CRA payroll deductions calculator as a guide or you can use payroll software like Wagepoint.
How Does Payroll Work in Canada?
Payroll in Canada works by having employers pay their employees for work they’ve done. The employers register for a payroll account with the CRA and then pay their employees.
As an employer, businesses must withhold payroll remittances (CPP, EI and income tax) from their employees’ pay. Those withholdings must be remitted to the Receiver General (CRA) on a regular basis - often monthly for most employers.
The employee receives their payment net of the payroll deductions every pay period.
For example:
- Paul earns $3,500 in gross earnings this pay period
- His employer withholds $191 of CPP, $55 of EI and $665 of income tax.
- Paul receives net pay of $2,589
Paul’s employer must remit these withholdings to the CRA.
The employer must also add in an employer portion of CPP and EI and remit that as well. Employer CPP is 1 times the employee’s contribution. Employer EI is 1.4 times the employee’s contribution. There is no employer portion of income tax.
Each year, the employer must prepare and file with CRA a T4 slip for each employee. The employees receive their T4 slips from their employer and use the slips to prepare their income tax returns.